Friday, January 31, 2014

Adventures with Fair Isle, Part II

So, my adventures with Fair Isle have stalled a bit this week. Life got in the way a bit, and the small amount of knitting time I had was devoted to making a couple of caps for a friend of my sister's who is beginning chemo therapy. Of course, these caps are a  much more important knitting priority, and I am always grateful that I can do something with my hands when I hear news such as this!

However, I did want to share a technique that I learned recently from Eunny Jang in her video that accompanies the Ivy League Vest called Introduction to Fair Isle: The Ivy League Vest. She recommended that knitters make several copies of the chart and arrange them into a simulation of the shape of the sweater so that they could then mark the shaping onto the chart in the same way it will look on the sweater. This would then allow the knitter to see exactly where on the chart the decreases and increases for waist shaping, armhole shaping and neck shaping would go.

I took her up on this tip and here is what I made to assist me in knitting the Ivy League Vest:


As you can see I used half of a poster board sheet and pasted several copies of the chart in the order they would need to be used from the bottom of the sweater to the top of the sweater. I used two columns to represent the right edge and the left edge of the front of the garment (I did not represent the entire sweater since I figured I wouldn't need it for the waist shaping, but I might need to make a separate sheet later with a chart to indicate the neck shaping). I also included a few copies  of the symbol keys along the sides of the poster board so I could easily look up and see one when I needed it (however, I already messed up and knitted the wrong shade of green the last time I worked on it, so you know what that means -- rip it!).

Here is a closer photo of the way I indicated where the decreases and increases are in the chart for waist shaping:


The arrows point to the lines I drew to indicate shaping. I always made sure that they went around the boxes that needed to be knitted and if it was a decrease I would draw the line diagonally through the stitch that needed to be decreased. If it was an increase, I would draw the line around the stitch that needed to now be included for an increase. 

This system seems to be working well. I am also able to write detailed notes along the sides and keep a tally at the bottom. Unfortunately, I still make mistakes, but at least when I do, I am finding it much easier to figure them out and fix them. Hopefully, next time I report on this project, I will be sailing along.

Look for at least one more post on this topic next week where I will give information on all of the excellent sources I have used to learn about Fair Isle over the years.

Tuesday, January 28, 2014

Adventures with Fair Isle

Although I have been knitting for 20 years and have a lot experience under my belt, one area in which I need more practice and have dreams of unmet accomplishments is Fair Isle knitting. As you probably know if you have read my introductory post on this blog, knitting Arans and other types of textured designs has been my primary focus for much of my knitting "career." If you check out my Ravelry profile (suzknittyspinner), you will see that I have knitted several cabled sweaters of varying difficulties (and even more than are pictured on Ravelry since I wasn't always great about taking photos) with Alice Starmore's Inishmore being my most prized achievement. My dream is to knit one of Alice Starmore's Fair Isle designs now that I have one of her Arans under my belt.

However, during all those years of dreaming about and knitting cables, I always had a desire to learn Fair Isle (stranded) knitting, too. Lack of time due to a busy work and family-life schedule kept me from pursuing this dream as intensely as I would have liked to have done. I did make some small steps towards my goal over the years, though. I began by knitting hats, starting with a very easy hat and slowly trying others:


I highly recommend this simple pattern from Homespun Handknit: Caps, Socks, Mittens & Gloves, the Mushroom Cap and Mittens by Jacqueline Fee, as a way to begin to practice your stranding technique. If you have done any reading about Fair Isle knitting, you probably know that there are several ways to hold the yarns when stranding. You can hold them both in one hand, or you can use two hands by knitting English-style in one hand and Continental-style in the other (as Elizabeth Zimmerman and Alice Starmore recommend). I choose to strand using both hands, but because I am an English-style knitter, I had to learn to knit Continental-style with my left hand. Before I even started the hat above, though, I practiced Continental-style knitting on a scarf. Once I felt fairly comfortable with it (after over five years of practicing it, I am still not nearly as comfortable with it as I am English-style -- can't teach an old dog new tricks!), I tried this hat. Since the pattern only requires you to strand the yarn for one stitch at a time, it was fairly easy to get the hang of stranding and to get into a flow with my knitting. The yarn used was also a sport weight yarn, so that made the stranding a bit easier to manage for a first project.

After this hat, I tried another Mushroom Cap in different colors for my niece as well as a stranded hat of my own design (using one of Barabara Walker's motifs from one of her Treasuries) for my other niece:


Making these simple hats and especially choosing the motif for the second hat was a lot of fun, and I began to feel like I might be getting the hang of stranded knitting (these hats weren't technically Fair Isle since they were only using two colors without changes in the colors in the background), so I decided to try something that looks a little more complicated but really isn't, The Fake Isle Hat by Amy King.


It was so much fun to knit that I made another:


After my success with all of these hats, I began to gain confidence and decided to try some mittens at a slightly smaller gauge, so I began Beth Brown-Reinsel's Nordic Mittens, and this is where things began to get a bit more tricky. Working on double-pointed needles is usually a breeze for me since I was fortunate to have a knitting teacher who got me going on socks as my second knitting project (long before socks on two circs or Magic Loop existed). However, dpns while stranding was not my strong suit (and still isn't, which is why I am now using Magic Loop for stranded mittens). Here is what I started and have to this day not finished:


Unfortunately, I put these mittens aside when I began feeling frustration from trying to strand across the gaps between dpns, and my enthusiasm for Fair Isle withered a bit for awhile. I then decided that maybe I needed a class, so for my 40th birthday, instead of having a party, I asked for a weekend-long knitting class on Fair Isle with Beth Brown-Reinsel. It was awesome, and I learned so much. That class renewed my interest in Fair Isle, so I began an Ivy League Vest by Eunny Jang. 


It was a bit slow going at first since the gauge of the Shetland wool is finer than anything I had used previously. However, I began to feel like I was getting a rhythm, and then I made a mistake in the pattern! I intended to find it and fix it, but life got in the way, and before I knew it, this project was put in hibernation along with the Nordic Mittens. They both sat in a closet for over five years. However, this is the year that I plan to finish both of them. For some reason, cable knitting came very easily to me, but I have had to work at Fair Isle. I am now at a point, though, where I really want to be able to say that I met the challenge and have become a proficient Fair Isle knitter. Hopefully, I will be able to do that by the end of this year.

I will be posting later this week with some tips about how I have jump-started both of these projects and the ways that they seem to be coming along more smoothly this time.

Please share your experiences with learning Fair Isle knititng or any questions you might have if you are just starting to learn this technique in the comments below. Click on "no comments" to get to the page where you can add your own comment. I would love to get a discussion going here about this subject. I have a lot of great ideas for further posts that can link you to many of the helpful resources and tips I have picked up along the way even though, as you can see, I have been very slow to put them into practice. I have studied this subject a lot more than I have practiced it over the years. :)

Friday, January 24, 2014

Proud Mama

The day that I have been dreaming about ever since my precious baby girl as born, over 16 years ago, has finally arrived -- she has become a knitter! I have had a plan to entice her into this lifestyle for quite awhile. Of course, my motives were selfish since I dreamed of spending hours upon hours of quality time with her, sipping tea and stitching as we had some mother-daughter bonding time. 

I began to put my plan into action when she was only 4 1/2 years old. Being the avid reader of all things Elizabeth Zimmerman-related, I was very familiar with Meg Swansen's (E. Z.'s daughter) story of how she became a knitter. Elizabeth taught Meg early, but as Meg tells the story in her book, Meg Swansen's Knitting, she only knitted in fits and starts until she was a young adult. It was at that point that she became passionate about the craft, and this began a truly incredible collaboration between mother and daughter. Most of us know the rest of that delightful story, but if you don't, I highly recommend that you check out some of Elizabeth Zimmerman and/or Meg Swansen's writing and videos.

So, I envisioned my daughter and I developing a crafting relationship that emulated this famous mother/daughter pair. When she quickly got the hang of knitting at four and half, I thought, here is my knitter -- only to see her put down her needles the next day never to pick them up again for many years. Then at around eight years old, she picked them up again, showing enough enthusiasm for the craft to inspire me to buy her own little crafting bag with measuring tape, needle-sizer, a pair of scissors, a knitting instruction book for girls, needles and yarn. She began a simple garter-stitch scarf, knitted on it with zeal for a couple of days, and then quickly became bored. After that, her little bag sat in a corner of her bedroom for several years until one day in a flurry of spring cleaning, she decided that she would never again want to knit, and so she was going to get rid of all of her knitting "stuff." Of course, this saddened me, but in the back of my head, I thought, "She doesn't know what her future will hold. One day, she will still pick it up again." A little voice inside me did wonder if maybe knitting just wasn't her thing since I had noticed that as artistic and crafty as she is that she gravitated towards projects that could be planned and executed in a day, which led her to sewing and making other small crafty projects for a time. 

Alas, the day finally came in the last month when my patience seems to have paid off; she asked to pick up her needles once again to make a cute wool headband that she saw in an advertisement. She had originally asked me to find a pattern and to make the headband for her, but before I had the chance to begin it, she suddenly came to me and said, "Mom, do you think I could learn to knit the headband myself?" This was music to my ears, as you can imagine, so I replied, "Of course. Let's get started." The next day, I bought her some luxurious wool to get her properly hooked and to make sure she loved every minute of this experience, reviewed the knit stitch with her, taught her to purl and then to combine knit and purl to make seed stitch, and off she went! She picked it up like no time had passed since her last knitting session and even worked on training her hands to tension the yarn over and under her fingers in the way I have always done, so she could pick up speed. Before I knew it, she was knitting away every time I saw her with a spare moment. She even mastered it enough to knit while watching T.V.  

It is indescribable the joy a knitting mother feels when seeing her daughter with needles in hand and yarn flowing thought her fingers! I am in heaven. Not to mention, it is a blast to have someone right in my own house with whom I can talk "shop."  Here are the results of her glorious efforts! 


Pretty good for a newbie, I must say with a mother's proud heart.  My delight continues, since she is now asking to make herself some leg warmers! We are off to our LYS tomorrow.

In case any of you are wondering what I have been up to lately, I am working steadily on my husband's sweater and the Granny Stripes Afghan. However, in the meantime, I quickly knitted this wonderful hat for a co-worker to help him deal with this incredibly frigid weather we have been having. The pattern is a free download on Ravelry called Men's Ski Hat. I used Berroco Vintage yarn so that he could wash it easily. The stitch definition was great, yet the hat is very soft.  He loves the hat and wears it, which is the best a knitter can ask for, isn't it?


Unfortunately, I am also working on another hat for a friend of my sister's who is starting chemo today. I am so glad to be able to make these hats for those who need them, but I certainly wish I didn't have cause to make them. I will show you the hat and share which pattern I made when it is finished. It is looking really nice so far, but there aren't enough rounds to show it now.

Happy knitting and crocheting!

Sunday, January 19, 2014

Free Fair Isle Hat Pattern

I decided to write up the pattern for the Simple Fair Isle Hat (Now called the Fair Isle Cross Hat since I posted it to Ravelry and needed to rename it) that I made last week to share with everyone. This my first time writing a knitting pattern, so please feel free to provide me with gentle constructive criticism via email if you see any problems with it. Here is a picture of the hat again in case you forgot or in case you haven't seen my earlier post:


Here is a copy of the pattern: Fair Isle Cross Hat

Please enjoy making your own color choices or even consider substituting pattern motifs for the ones I used. If I were to knit this again, I would definitely substitute a darker green for the one I used since it looks too light next to the cream background. Feel free to leave questions about the pattern in the comment section. Happy knitting!

Friday, January 17, 2014

What's on the Needles?

I currently have several projects started since I have always been one to enjoy juggling more than one fiber arts project at a time. This allows me to follow my interests on any given day and actually helps me to finish projects more quickly. That seems counter-intuitive, but it really works. I keep one or two simple knits on the needles, which can be carried around to the kids' activities. I am known for knitting at volleyball matches, basketball matches, or while waiting to pick up kids from practice. Since I can knit without looking, as long a the pattern is a simple knit and purl pattern.  Most of these simple items are sweaters, scarves, cowls, or socks. The times in my life as a crafter when I have neglected starting a new project right after ending another one have been the times when my progress really seemed to stall; I had the fewest FOs in those years.


However, I also enjoy knitting more complicated Aran patterns (thus the name of this blog), colorwork patterns, and lace patterns. These are all reserved for my night-time knitting or on those rare occasions when I can knit during the day (my favorite but least frequent type of knitting). These styles of knitting all take concentrations, which keeps me highly engaged, but it also means they don't make the best carry-around knitting.


Lately, I have also had a crochet project going. Currently, it is the afghan, I showed in an earlier blog entry.


Of the items, I am currently knitting, my favorite one is a pullover that I am making for my hubby using Lisa Lloyd's excellent pattern, Kearsarge.  I had been eying this pattern for a long time, ever since Lisa asked me to do some test knitting for A Fine Fleece when she was designing and writing for the book. I admired this design immediately for its unconventional pairing of mistake rib on the sleeves with basket weave on the body. This pairing makes for a handsome sweater that I knew would be perfect for a man. When I finally got around to showing it to my husband, I was so glad that he liked it as much as I did. Here is the back of the sweater so far.


One of my favorite aspects of Lisa Lloyd's designs is the careful attention she pays to the details of the sweater to make it easy for the knitter to seam her sweaters and to provide an attractive feature to the sweater. Notice her smart use of selvedge stitches along the armhole edge before the decreases (she also pays attention to using SSK and K2 tog in an order that provides an appealing slant to the decrease).


My only slight concern at this point is that I notice a little bit of waffling along the seam edge that seems to occur when a purl stitch is decreased with a knit stitch. I am not overly concerned about this at this point since gentle wet blocking will do a world of good to the sweater since it is made of 100% wool (Paton's Classic Wool in Dark Grey Mix, which I got on a great 40% off sale). I am really enjoying making this sweater so far, and I can't wait to see what it looks like when it is finished.


Monday, January 13, 2014

What is Old is New Again: Reclaiming Yarn from Abandoned Projects

As I am sure you have all experienced, I have had my share of abandoned projects. Since my free time is limited between working full time and raising kids, I want to be sure I am enjoying what I am doing when it comes to my hobbies. This means that I won't hesitate to put aside a book that isn't interesting me or a fiber-related project that I am not enjoying making. However, I hate to let the yarn go to waste when this happens, so I have learned to reclaim it. I actually find this process enjoyable when it is wool and wanted to show you how I do it. Here are the steps I use with tips to help make the process run smoothly:


  • I rip back the project, winding the yarn into a ball as I go.  I am not too particular about how I wind the ball of wool (as I would usually be with new yarn to be sure I didn't wind too tightly) since this yarn will have to be turned into a hank, washed, and rewound before I use it.
  • Using a niddy noddy, I wind the ball of wool into a hank (this can also be done around your knees). If I am not sure about the yardage I have, I will also use the niddy noddy to calculate yardage as I wind.
  • Once I have a full hank wound on the niddy noddy, I use some spare yarn to tie the hank in four spots (one of the ties can actually be the ends of the hank).
  • It is now necessary to wash the wool in order to allow the wetness to straighten out the kinks that are in it from knitting. Even though, you don't have to shampoo it at this point, I always like to use a little bit of Eucalan for the soaking process. I fill a tub with cold to lukewarm water, pour in a tiny amount of Eucalan, and then I carefully place the hank in the tub, pressing it down gently to allow the water to soak in it.
  • At this point, the hank will begin to spread out and it might seem as if the yarn will get tangled. Don't worry, though, because as long as you used the four ties evenly spaced around the hank, it should be fine. Just be sure to grap it in a way that captures all the strands when you lift if from the water in the next step.
  • Lastly, after the hank soaks for about 15 minutes, gently take it out and hang it on a hanger over the wash basin so that the water doesn't drip onto the floor. When you look at it hanging there, you will feel as if a miracle has occurred since what looked like a kinky mess is now beginning to look like the yarn you once knew. Once it is dry, you will really feel as if your wool is brand new. Wool is an amazing fiber, as you know if you have ever completed this process, or as you will find out if you try it!
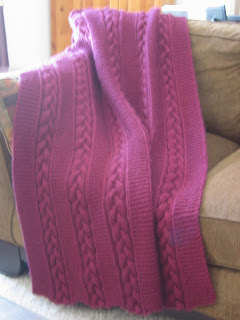
Below are some photos to illustrate the process. The wool is Brown Sheep Nature Spun, which I tried to use on a crocheted afghan years ago. I ended up using much of the yarn I bought on the knitted afghan below, but the extra skeins and this reclaimed yarn from the original crocheted version will be used to make Lisa Lloyd's Halcyon Aran soon.


Here is the knitted afghan that I made with most of the skeins I bought years ago:


The following pictures illustrate some of the steps in the process I described above:

Winding the Yarn on the Niddy Noddy


The Kinky Mess After Tying Off


Taking a Bath in the Tub


Hanging Out to Dry


Knitted Up into a New Swatch for a New Project!


Do any of you have stories of reclaimed yarn? I would love to hear about them in the comments section. Feel free to share your own process and any tips you have!


Saturday, January 11, 2014

Experimenting with Design

I recently completed a warm hat for a friend who is going through chemo and needs as many hats as she can get with these extremely cold temperatures we have been having in the Midwest. I had already made her a simple cotton chemo cap for indoors, so this time I thought I would make her something that was beautiful and really warm for outdoor wear. I started searching for patterns, but then I got the idea that I should design one of my own. I have created a few of my own garments over the years (mostly hats and one sweater). I always enjoy the process of searching through stitch guides and choosing colors. This time, though, I wanted to get more practice with Fair Isle knitting since it is something I have tried on and off, but that I don't feel I have mastered yet. Watching Elizabeth Zimmerman's incredible Knitting Workshop DVD (a Christmas present) had inspired me since she was encouraging beginning knitters to design their own two-color hats; I have been knitting for twenty years -- surely I could do this! Here is what I came up with:


I had a lot of fun choosing the motifs and deciding which colors to use for each motif and in each round. Since I wanted to be sure the hat was easily washable for my friend, I used some left-over acrylic that I had from a baby afghan (I would definitely advise using wool, though, if you can). The yarn was worsted weight. The motifs come from Mary Smith and Maggie Liddle's A Shetland Pattern Book (a great little book with easy to use Fair Isle patterns). I choose the central motif of the crosses so that I could knit some "prayers" into her cap. The other motifs were chosen since they had repeats that were divisible into the main pattern repeat and into the total number of stitches on the hat. I am happy with the results overall, but here are a few things I would change if I made another cap using this design:


  • I would use a different green. The one that I had in my stash was a bit two light and doesn't pop well enough against the cream yarn. The pattern color really should be dark if the background color is light and vice versa.
  • I would use Eunny Jang's technique from her Introduction to Fair Isle video where she recommends knitting all the stitches on the color-change row of corrugated ribbing instead of purling any of them in order to avoid the visible line in the color-change row. Of course, I saw her tip after I had completed the hat. The visible line doesn't bother me too much, though, since it is something I have seen in a lot of corrugated rib, but Eunny's technique is definitely something I will try next time.
  • I might substitute different pattern motifs above and/or below the crosses
This project was a lot of fun since I really liked making so many choices and having everything under my control. It meant that I had to knit by the seat of my pants at times and there was some ripping and re-knitting, but it gave me a real sense of why E.Z. always had the mantra of "be the boss of your knitting." It is a great feeling. If anyone is interested in the pattern directions, I would be happy to write them up and post them to the blog. Just let me know by replying to this entry in the comments section below. (Click on the spot where it says "no comments" or if someone else has commented, click on where it says "comments" with a number before it.)

Now that I have completed this hat fairly successfully, I think it is time to pick up some of the other hibernating Fair Isle projects I have started over the years:

Beth Brown-Reinsel's Nordic Mittens


 Eunny Jang's Ivy League Vest


As you all know from the title of my blog, I am an Aran knitter at heart, but I still like experimenting with two-color knitting. Now if I could just finish something bigger than a hat!

Sunday, January 5, 2014

The Benefits of Swatching

I am a big proponent of swatching. I can hear some groans, but please listen to what I have to say. After reading about these benefits, you might actually see the ways it can be fun as well as helpful. The numerous benefits to swatching are as follows:

  •  To determine gauge: This is the most common use for making swatches. I find it especially beneficial when I am using a new yarn (or even more importantly my own handspun yarn), and I want to see what needle size gives me the best hand to the fabric made from the yarn. I typically knit to recommended gauge on the ball band, but it is still nice to test out different needles to see which one gives the fabric the best look and feel. I always knit my projects to the gauge that looks best for the yarn I am using rather than to the recommended gauge by the designer. If the gauge that the designer has suggested is important to the overall look of the design, I will find a yarn that works well at that gauge rather than to try to make the yarn I have match the gauge (for example, if the design call for bulky weight yarn, it is probably best to use it since the bulky yarn might be providing the trendy look of the garment). Yarns will tell you what they want to be knitted into if you make a swatch, which brings me to my next point below. 
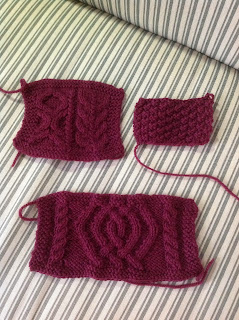
  • To determine project choices: If you are like me, you probably have some yarn in your stash. I haven't accumulated a large stash, but as a result of having left-over yarn and yarn that was intended for a particular project in which I may have lost interest, I do have some yarn that needs a project. This is where swatching can be really fun! I begin to get ideas for projects to choose for different yarns in my stash, but I first make a swatch to determine gauge and to be sure I like the look of the pattern in the yarn I am choosing. Sometimes, I find that the yarn doesn't look as good as I thought it might in a given pattern, so it is back to the drawing board. This process can be inspiring since it challenges me to think differently about the yarn and gives me a good excuse to pull out books from my collection or to peruse Ravelry in hunt for the perfect project. I love this stage of knitting more than any other. The photo below illustrates the process I use and the way that a certain yarn can look a lot better in one stitch pattern than another:


The top row of swatches (2) were made to test out the yarn (Brown Sheep Nature Spun in Chuck Berry) for Lisa Lloyd's Staghorn aran sweater from A Fine Fleece. The first of the two is a swatch I actually made for another pattern choice before I changed my mind and decided to try Staghorn; however, it used the same cable motifs (XO and Staghorn), so it gave me a good indication of what those motifs would look like in this yarn. The other swatch is the filler stitch for Staghorn (double moss). After making these swatches, I wasn't loving the look of either of them in the Chuck Berry colorway. This yarn has a beautiful, deep color, but there is no tonal variation. I had envisioned Staghorn in a yarn with some heathering or subtle tone changes. So, I decided to try another swatch for another pattern. The result is what you see below the first two swatches -- the central motif for Lisa Lloyd's Halcyon Aran. Isn't it stunning!

I am pleased with the result of the yarn for Halcyon since that design seems to have a sharper, crisper look to it that is highlighted well in a yarn with one tone. I had also seen an example on Ravelry in a deep red that made me realize how nice this design would look in the Chuck Berry color I had. As you can see, swatching really paid off in this instance, and it was also a very enjoyable process. I felt like I had conquered a challenge since this yarn had been on may hands for several years. It was the left over yarn from an afghan I made and for which I seriously over bought extras. Swatching saved me from running out to buy more yarn and gave me the satisfaction of being able to knit from my stash.

And now for the last use for swatching:

  • To test out you own designs: I have done very little knitting of my own design over the years, but I do like the challenge of creating something entirely my own. It is definitely something I want to spend more time on in the future (maybe once the kids move on and I regain some free time!). If you intend to do any designing of your own garments, though, swatching is essential. It helps you to test your ideas, test the yarn choices you make, and to figure out the math needed to calculate the design. IF you are considering doing your own designing, I recommend this great book by Deborah Newton, Designing Knitwear, in which she writes a dissertation on swatching!
I will definitely continue to swatch in the future, and I hope that some of you might consider trying it if you haven't done so before. It can be a lot more fun that you might have imagined.

Friday, January 3, 2014

Getting Interested in Crochet Again

When I began this incredible fiber arts journey I have been taking over 20 years ago, it was crochet that started it all. I had learned to crochet from my great grandmother, or as everyone called her, "Mum Jo." She was one in a line of talented stitchers, going back at least as far as her own mother. I am fortunate to have a few of their works in my possession, including crocheted afghans, dollies, table clothes, and a piece of knitted garter stitch cloth. Mum Jo's daughter, my grandmother, was also a very talented seamstress.

Given how much the needle arts was a part of the lives of the women in my ancestry, it is surprising how little of a role they played in my childhood. I learned latch-hook rug making as many kids do (but never finished a project), learned to sew a button from my grandmother, and later took a sewing class. None of these pursuits really made much impact on my day-to-day life as a child, though. In fact, I remember reading, drawing, and swimming being my primary interests. Luckily, though, Mum Jo took me aside one summer day when I was visiting her and introduced me to crochet. She gave me some homely tan, acrylic yarn and a crochet hook. She taught me to make a foundation chain and to single crochet. She may have taught me double crochet, too, but I can't remember that. All I know is that I worked on a single crochet ripple "afghan" for awhile, but only ended up with less than five inches completed. It then sat in my closet on a shelf for over 10 years.

Every time I would go home to visit my parents, I would peek into my old closet and see that crochet. I often regretted giving it up and wondered if I could start again, but by that time, Mum Jo was in her 90s and had given up crochet long ago. I didn't know who to ask for help, yet the crochet kept calling me. Finally, during a visit home in my early 20s, I decided to bring the crochet back with me and to ask a colleague to help me get started again. She was a talented quilter, but I knew she also crocheted a bit. She got me going on single crochet again, and then I bought a pamphlet from a craft store to learn the rest. I caught on quickly, and before I knew it, I was hooked!  Many late nights were spent pondering over stitch patterns, planning afghans, and finally crocheting them. Not long after that, a friend introduced me to knitting, and eventually when I got the hang of it, my crochet took a far back seat. However, I always enjoyed it, and lately it has been calling to me again -- mostly due to a blog I found that really inspired me: Attic24. Lucy's glorious colors and inviting afghans caught my attention and have held my attention for awhile now. Lately, I decided to begin one of her Granny Stripe Blankets, using an assortment of Vanna's Choice colors that I had accumulated for an abandoned granny square afghan. I am so pleased with the way this afghan is taking shape and am enjoying choosing the color combinations very much. Here is the work in progress:


And a close up to illustrate the color combinations:


My plan is to edge the afghan in a way that predominately highlights the blue since the room I am making it for is decorated with blue accents. We have a red trunk/coffee table in the room, too, hence the red stripe running through the afghan every so often. The couch is a tan color, which ties in well with  the earth tones in the blanket. This project has brought me more confidence in my sense of color and has inspired me to look at ways of using color combining more in both my knitting and crochet.

After being bitten by the crochet bug again, I decided to whip up a quick hat as a Christmas gift for my neighbor's new baby girl. They had generously brought us homemade pumpkin roll for the holidays, and not being a baker myself, I had been wondering how I could return the gesture. Crocheting an adorable hat seemed like just the thing!


If any of you have thought about trying crochet, I encourage it since it compliments knitting well. From a practical standpoint, crochet can be used to make a great provisional cast-on or to secure steeks in stranded knitting. It can also be used to make practical or pretty edges. I have also found that there are times when taking a break from one repetitive motion to work in a completely different repetitive mode really helps me to prevent the onset of tendonitis. This is especially true since I predominately knit using English style (right-hand yarn hold) and crochet in the traditional left-hand yarn-hold manner. Even though, I sometimes switch to Continental Style knitting (left-hand yarn hold) to relieve repetitive stress, crochet feels even more natural to me and is, therefore, great for mindless stitching in the evenings. I have gotten more proficient at Continental style knitting through practice, but it is nowhere near as effortless for me as English style knitting or crocheting is, having done both of these needle work techniques for over 20 years.

Knitting will always be my greatest passion, but it is fun having other fiber arts calling my name, and crochet is definitely one that will steal my attention from time to time!